How to Use a Pipe Threading Tool: Beginner Guide
⚡ Quick Answer
To use a pipe threading tool, secure the pipe in a vise, select the correct die size for your pipe diameter, attach the die head to the threader, apply cutting oil, then rotate the tool clockwise while applying steady forward pressure. Continue until the die clears the pipe end, then back off counterclockwise and clean the threads. The full process takes 5 to 10 minutes per pipe end once you know what you are doing.
If you have never used a pipe threading tool before, the equipment can look intimidating. Between the die heads, the ratchet handles, the cutting oil, and the pipe vise, it is easy to feel overwhelmed before you even start. The good news is that pipe threading is a learnable skill, and once you understand the logic behind each step, it becomes surprisingly straightforward.
This guide walks you through everything from choosing the right tool to cutting clean, leak-free threads on your first try. Whether you are a homeowner tackling a plumbing repair, a maintenance technician fitting a new gas line, or simply someone who wants to understand how the trade works, this is the right place to start.
Affiliate disclosure: This post contains affiliate links. As an Amazon Associate, we earn from qualifying purchases at no extra cost to you. No brand pays for placement here. Read the full disclosure →
📚 Table of Contents
- What Is a Pipe Threading Tool?
- Types of Pipe Threading Tools
- What You Need Before You Start
- Safety First: Protecting Yourself
- How to Thread a Pipe: Step by Step
- Understanding Thread Standards (NPT, BSP)
- Common Mistakes Beginners Make
- Caring for Your Threading Tool
- Frequently Asked Questions
What Is a Pipe Threading Tool?
A pipe threading tool is a device that cuts helical grooves, called threads, into the outside of a metal pipe. These grooves allow two pipes or a pipe and a fitting to screw together and form a watertight or airtight seal. You will encounter threaded pipe connections in water supply systems, gas distribution lines, compressed air systems, fire sprinkler networks, and industrial process piping.
Threading tools work by pressing hardened steel cutting edges, known as dies, against the pipe surface while rotating them around the pipe’s circumference. Each rotation removes a small amount of metal and deepens the thread profile until the correct thread depth and taper are achieved. The process sounds mechanical, but it does not require brute force. Technique and lubrication do the real work.
Pipe threading is not the same as tapping (which cuts threads inside a hole) or die cutting on a bolt (which uses a smaller hand die). The dies used for pipe threading are larger, tapered, and designed specifically for the outside diameter of standard pipe sizes.
Types of Pipe Threading Tools
Before you learn how to operate one, it helps to understand the category of tool you are working with. There are three main types used in the field.
| Tool Type | Best For | Pipe Range | Typical Cost |
|---|---|---|---|
| Manual Ratchet Threader | Small jobs, occasional use, remote locations | ¼″ to 2″ | $40 to $120 |
| Hand-Held Electric Threader | Medium volume, jobsite portability | ¼″ to 2″ | $200 to $600 |
| Pipe Threading Machine (Bench) | High volume, large pipe, professional shops | ¼″ to 6″ | $500 to $3,000+ |
For most beginners and DIY plumbing projects, a manual ratchet threader set is the most practical starting point. Brands like RIDGID, REED, and IRWIN make reliable entry-level sets that include a ratchet handle, multiple die heads in common sizes, and a carrying case. If you are a professional who will thread pipe regularly, investing in a bench machine pays for itself quickly in saved time and physical effort.
What You Need Before You Start
Gathering your equipment before you begin prevents mid-job interruptions and keeps you focused on technique. Here is what you need for a manual or electric threading operation.
Essential Equipment
- Pipe threading tool with the correct die size for your pipe
- Pipe vise or chain vise to hold the pipe securely while you work
- Pipe cutter or hacksaw to cut pipe to length before threading
- Pipe reamer to remove the burr left inside the pipe after cutting
- Cutting oil (threading oil) to lubricate the dies and carry away metal chips
- Measuring tape and marker for accurate pipe lengths
- Deburring file or chamfer tool for final pipe end cleanup
- Rag or paper towels for wiping the pipe and catching oil drips
- Thread gauge or fitting to verify the finished thread
💡 Pro Tip on Cutting OilNever skip cutting oil. It is not optional lubrication. Threading oil serves three essential purposes: it cools the die cutting edges to prevent premature wear, it flushes metal chips out of the die teeth so they cannot re-cut and damage the thread, and it reduces the torque required to turn the tool. Dry threading destroys dies and produces rough, leak-prone threads.
Safety First: Protecting Yourself
Pipe threading is not a high-risk activity compared to many trades, but metal chips, rotating equipment, and cutting oil create genuine hazards when safety is ignored. Before you pick up the tool, take a moment to set yourself up correctly.
⚠ Safety Rules to Follow on Every JobWear safety glasses at all times. Flying metal chips are small, sharp, and move fast. Wear cut-resistant work gloves when handling cut pipe ends, but remove gloves if they are loose when operating a power threading machine. Keep bystanders away from the work area. Never reach over a spinning pipe or rotating die head. Secure the pipe thoroughly in the vise before applying any cutting force.
- Wear ANSI-rated safety glasses or a face shield throughout the process
- Use cut-resistant gloves when handling pipe with sharp cut ends
- Ensure the pipe vise is bolted to a stable bench or tripod before loading pipe
- Keep the work area clear of trip hazards, including oil-soaked rags on the floor
- When using a bench machine, tie back long hair and secure loose clothing before starting
- Dispose of metal chips into a dedicated metal waste container, not loose in a rubbish bin
How to Thread a Pipe: Step by Step
The following steps apply to manual ratchet threading, which is the most common starting point for beginners. Power threading machines follow the same sequence but automate the rotation. Work through each step deliberately on your first few pipes and speed will come naturally with practice.
1.Measure and Cut the Pipe to Length
Mark your required pipe length with a marker and cut using a pipe cutter or hacksaw. A pipe cutter gives a cleaner, square cut and is strongly preferred for copper, steel, and stainless pipe up to 2 inches. After cutting, the inside edge will have a raised burr that restricts flow and must be removed before threading.
2.Ream the Inside of the Pipe
Insert your reamer (the triangular or spiral blade that usually attaches to the pipe cutter or a separate handle) into the pipe end and rotate it until the inside burr is gone. Run your finger carefully along the inside edge. It should feel smooth and slightly chamfered. Skipping this step restricts water flow and creates turbulence that causes corrosion in copper and galvanised pipe over time.
3.Secure the Pipe in a Vise
Mount your pipe vise to a stable surface. Place the pipe in the vise jaws so that the end you intend to thread extends 6 to 12 inches beyond the jaws. Tighten the vise firmly. The pipe must not rotate or shift when you apply threading force. If it moves at all, stop and re-clamp before continuing.
4.Select and Install the Correct Die
Match your die size to your nominal pipe size, not the pipe’s actual outside diameter. Nominal pipe sizing is a trade convention: a half-inch pipe has an actual outside diameter of 0.840 inches, for example. Check the stamping on your pipe or use a pipe gauge if you are unsure. Snap the die head into the ratchet handle, confirming the arrow on the die head points in the direction of the threading rotation (clockwise when viewed from the die end).
5.Apply Cutting Oil to the Pipe and Die
Coat the first 2 to 3 inches of the pipe end generously with threading oil. Apply more oil directly into the die head openings. Keep the oil can within reach because you will re-apply it every two to three full rotations throughout the threading process. There is no such thing as too much oil at this stage.
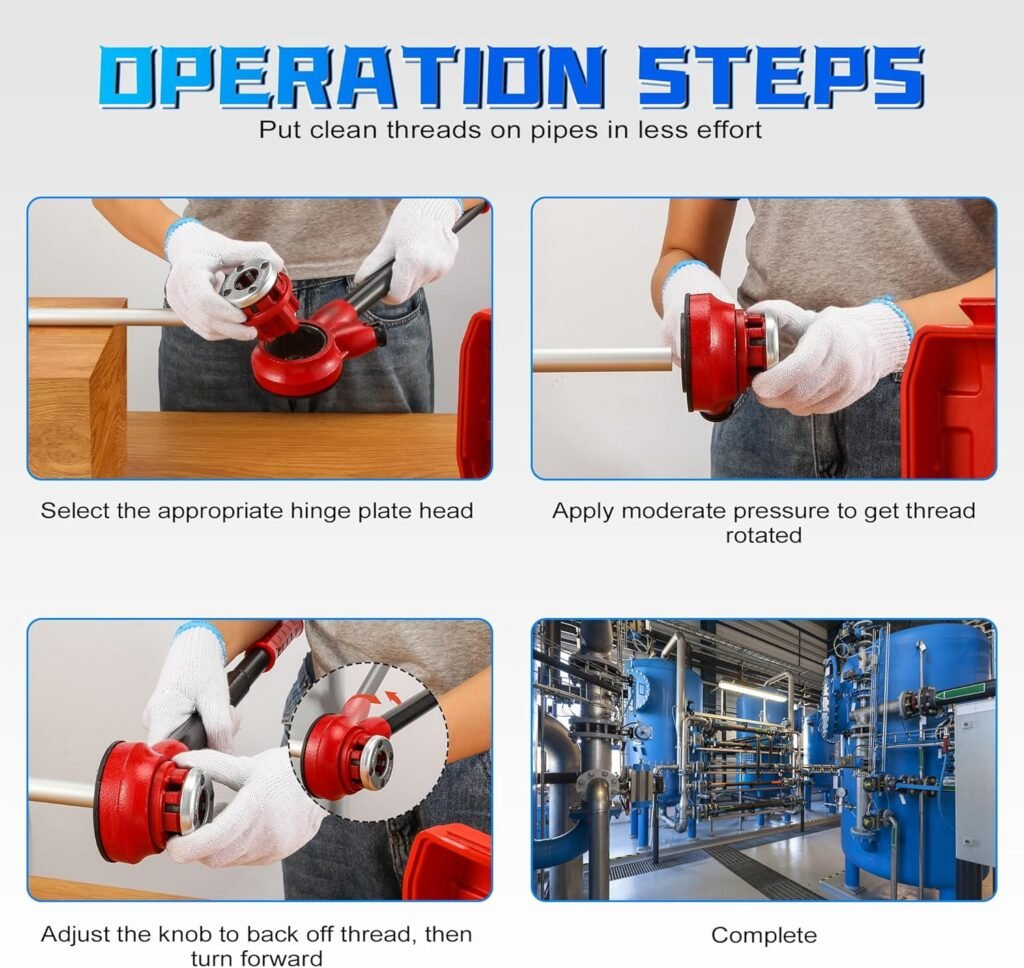
6.Start the Thread with Steady Forward Pressure
Place the die head squarely against the pipe end. Using both hands on the ratchet handle, apply firm forward pressure while rotating the tool clockwise. The dies need to bite into the pipe metal and establish the thread start, which requires the most effort of the entire operation. Once you feel the die catch and the tool begins to advance on its own, ease off on the forward pressure and let the thread geometry pull the die forward naturally.
7.Continue Threading with Oil and Consistent Rotation
Maintain a steady clockwise rotation, pausing to add cutting oil every two to three strokes of the ratchet. You will see silver metal chips curling out of the die head. This is normal and shows the dies are cutting correctly. Keep rotating until the pipe end appears through the front face of the die head, which indicates you have cut sufficient thread length for a standard fitting. For tapered NPT threads this is typically 3 to 5 full threads beyond the die face.
8.Back Off the Die and Clean the Threads
Once you have reached the correct thread length, reverse the ratchet direction and rotate counterclockwise to back the die off the pipe. Do not pull the die off forward. Wipe away excess cutting oil and metal chips from the threads with a clean rag. Inspect the threads visually: they should be uniform, clean, and sharply defined with no torn or missing crests.
9.Test the Thread with a Fitting
Thread a coupling or fitting onto the pipe by hand. It should engage smoothly and turn at least two to three revolutions before requiring a wrench. If it binds immediately, the thread may be damaged or the die was misaligned at the start. If it feels very loose or does not seal when a wrench is applied, the die may have been worn or set incorrectly. Apply PTFE tape or pipe dope and complete the connection according to your piping system requirements.
Understanding Thread Standards: NPT and BSP
One of the most common sources of confusion for beginners is thread standards. Not all pipe threads are the same, and mixing incompatible thread standards is one of the most reliable ways to create a joint that looks correct but leaks immediately or fails under pressure.
| Standard | Full Name | Taper | Common Regions | Sealant Required |
|---|---|---|---|---|
| NPT | National Pipe Taper | 1 in 16 (3/4″ per foot) | USA, Canada, Mexico | Yes (PTFE or pipe dope) |
| BSPT | British Standard Pipe Taper | 1 in 16 | UK, Australia, Asia, Africa | Yes (PTFE or pipe dope) |
| BSPP | British Standard Pipe Parallel | None (parallel) | UK, Europe, industrial | Yes (O-ring or washer) |
In most of sub-Saharan Africa, East Africa, and Kenya specifically, you will encounter both BSP threads on older British-era infrastructure and NPT threads on imported American or Chinese fittings. Always check the thread form on your existing fittings before cutting new threads. A thread gauge costs very little and prevents costly mistakes.
💡 How to Identify NPT vs BSP by EyeNPT threads have a slightly different pitch from BSPT, and the two are not interchangeable even though they have the same taper angle. If you thread an NPT pipe into a BSP fitting it may start turning but it will never seal properly and will eventually crack the fitting or the pipe. When in doubt, take a fitting to your supplier and have it verified before cutting.
Common Mistakes Beginners Make
Every tradesperson makes these errors at some point. Knowing them in advance saves you time, wasted pipe, and the frustration of a joint that will not seal.
Good Habits to Build
- Apply oil continuously throughout threading
- Keep the die square to the pipe at the start
- Ream the pipe end before every thread cut
- Check die sharpness before starting
- Use a thread gauge to verify size
- Back off the die counterclockwise when done
Mistakes That Ruin the Job
- Threading without cutting oil on any rotation
- Starting the die at an angle to the pipe
- Using a worn or chipped die on new pipe
- Pulling the die off forward after threading
- Mixing NPT and BSP fittings on one run
- Threading without securing the pipe in a vise
Crooked Thread Start
The most common beginner error is starting the die at a slight angle to the pipe axis. Once the first two or three threads are cut crooked, the rest of the thread follows. The result is a cross-threaded joint that leaks and cannot be corrected without cutting the pipe end back and starting again.
To avoid this, hold the die head firmly against the pipe face with equal pressure all around the die before you begin rotating. Some tradespeople use their palm to press the die center squarely against the pipe while their fingers control the handle rotation during the first quarter turn.
Using Worn Dies
Threading dies wear over time, particularly when used on hard steel pipe without adequate lubrication. A worn die produces threads with rounded crests, rough surfaces, and inconsistent depth. The tell is a thread that looks right but does not seal even with correct PTFE application.
Check your dies by cutting a test thread on a scrap pipe and threading a new fitting onto it. If the fitting feels loose or the threads look chewed rather than sharp, it is time for new dies.
Wrong Thread Length
Threads that are too short will not engage enough of the fitting to seal. Threads that are too long can bottom out in a fitting and create a gap rather than a seal. Standard practice is to thread until the pipe end is flush with or just protruding from the front face of the die head. This produces the correct engagement length for standard NPT and BSP fittings in most plumbing and gas work.
Caring for Your Pipe Threading Tool
A quality pipe threading die set represents a real investment. With proper care, dies last for years and thousands of thread cuts. Neglected, they dull within a few months of occasional use.
- Clean after every use. Wipe the die teeth and ratchet mechanism with a clean rag after each session. Metal chips left in the dies act as abrasives during the next use.
- Oil the ratchet mechanism. Apply a light machine oil to the ratchet pawl and spring after cleaning. A dry ratchet wears quickly and becomes unreliable.
- Store dies in a dry location. Steel dies rust quickly in humid environments. Keep your die set in its original case and add a silica gel packet if you store tools in a damp area.
- Inspect die teeth before each use. Look for chipped or broken teeth. A single broken tooth will produce a damaged thread every rotation. Replace the die before starting.
- Never force a stuck die. If the die jams on a pipe, do not apply increasing torque. Back off, add oil, and try again slowly. Forcing a stuck die breaks teeth and can split the die head.
💡 Recommended Entry-Level Threading SetsThe RIDGID 37825 Manual Pipe Threader Kit is the benchmark in this category, covering sizes from 1/2 inch to 2 inch with a ratchet handle, four die heads, and a carry case. For occasional home use, the IRWIN Industrial Thread Restorer and Die Set offers good value with a more compact form factor. Both are stocked at most large hardware suppliers.
Frequently Asked Questions
Can I thread galvanised steel pipe the same way as black iron pipe?
Yes, the threading process is identical. Galvanised pipe has a zinc coating that may produce slightly more chip buildup in the dies, so clean the dies more frequently and apply oil generously. The threads will function the same as black iron once cut.
How many threads should I cut before the joint is strong enough?
For standard NPT connections in water supply (pressure up to 150 psi), the pipe should engage at least 5 to 7 full thread turns in the fitting. When you apply a fitting by hand it should start easily and seat after 3 to 4 hand turns. The final 2 to 3 turns are made with a pipe wrench to achieve the correct compression. Over-tightening cracks fittings; under-tightening causes leaks.
Do I need PTFE tape even if my threads look perfect?
Yes. Tapered pipe threads seal by metal-to-metal contact at the thread crests, but microscopic surface irregularities always remain. PTFE tape (or pipe dope on gas lines) fills these gaps and provides the actual seal. Threads cut without sealant may hold pressure initially but will typically weep at the joint within weeks, particularly with temperature cycling.
Can I thread copper pipe?
You can, but it is uncommon and generally not recommended. Copper work pipe (as opposed to copper tube) is softer than steel, and threading removes material that the pipe wall may not have to spare in smaller sizes. Most copper plumbing uses compression fittings, solder joints, or push-fit connectors instead. If you must thread copper, use a sharp die, plenty of oil, and go slowly.
What is the correct direction to rotate the threading tool?
Clockwise when viewed from the die end of the tool, looking toward the pipe. This is the same direction you turn a bolt to tighten it. To back the die off after threading, reverse to counterclockwise. If you rotate the die backward while threading, the cutting edges will not cut and you risk damaging the thread already cut.
My thread feels tight when I try to fit a coupling. What went wrong?
The most likely causes are a misaligned die start (crooked thread), an incorrect die size, or debris left in the thread from the cutting operation. Wipe the threads clean with a rag and try the coupling again. If it still binds after cleaning, inspect the thread for obvious irregularities. If the start is visibly crooked, cut the pipe end back past the damaged thread and re-thread.
Final Thoughts
Pipe threading is one of those trade skills that looks complicated until you do it once, and then it feels obvious. The sequence of steps does not change: cut, ream, clamp, select the die, oil, thread, back off, clean, test. Follow that sequence on every pipe and you will produce consistent, professional results from your very first session.
Invest in a quality die set from the start. Cheap dies dull quickly, produce poor threads, and cost you more in frustration and rework than the savings justify. The RIDGID and REED names have been the benchmark in threading tooling for decades and remain the sensible choice for anyone who plans to do this work regularly.
If you found this guide useful, share it with a colleague who is learning the trade. And if you have questions about a specific pipe size, material, or fitting type that this guide did not cover, leave a comment below and we will add it to the FAQ.
Also Read On:
GEVEELIFE Drywall Sander with Vacuum Review 2026: Best Dust-Free Sanding Tool?
LEXIVON Impact Grade Socket Adapter Set (3-Piece) Review 2026
WORKPRO Premium Utility Knife (Retractable Box Cutter)-Honest Review 2026